Archiv der Kategorie: Security

Windows 10 Passwort vergessen: Administratorkonto offline aktivieren

Wenn Sie sich an einem Windows-10-PC nicht mehr anmelden können, beispielsweise weil Sie das Passwort des Microsoft-Kontos vergessen haben oder die Vertrauens­beziehung zwischen der Workstation und der AD-Domäne nicht hergestellt werden kann, dann benötigen Sie ein lokales Konto mit administrativen Rechten.

Falls Sie ein solches Konto schon länger nicht mehr benutzt haben, dann erinnern Sie sich möglicherweise aber gar nicht mehr an seine Anmeldedaten. Außerdem kann es sein, dass aus Sicherheitsgründen kein weiterer lokaler Account auf diesem Rechner existiert.

Schritt-für-Schritt zum Administrator-Konto

In solchen Situationen gehen Sie nach folgender Anleitung vor, um das eingebaute Administrator­konto offline zu aktivieren:

  1. Starten Sie den PC vom Installations­medium, unter Umständen müssen Sie dafür die Boot-Reihenfolge im BIOS ändern. Sobald das Setup-Programm geladen ist, drücken Sie Umschalten + F10, um die Eingabeauf­forderung zu öffnen.
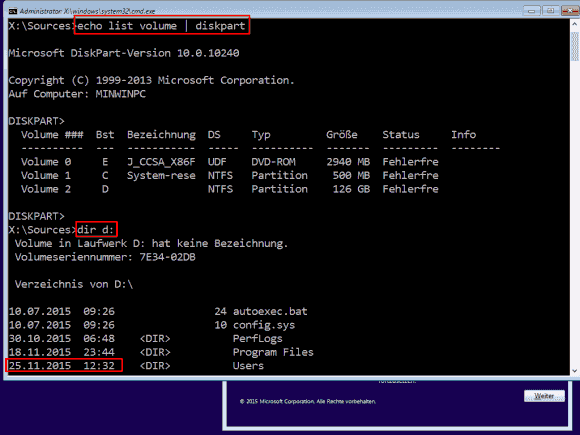
  2. Finden Sie nun den Laufwerksbuchstaben der Partition, auf der Windows 10 installiert ist. Dieser ist wahrscheinlich nicht identisch mit jenem, von dem das Betriebssystem sonst bootet. Das vom Setup verwendete Windows PE nimmt normalerweise X: in Beschlag, und das Offline-Windows erhält meistens die Kennung D:. Eine Übersicht über die zugeteilten Laufwerksbuchstaben erhalten Sie mit

    echo list volume | diskpart
    Zusätzlich sollten Sie zur Identifizierung der korrekten Partition mit dir d:\ prüfen, ob das Datum des Verzeichnisses users mit dem Zeitpunkt Ihrer letzten Anmeldung übereinstimmt.

Nach dem Booten vom Installationsmedium kann man in der Eingabeaufforderung alle nötigen Vorbereitungen treffen.

Nach dem Booten vom Installationsmedium kann man in der Eingabeaufforderung alle nötigen Vorbereitungen treffen.

  1. Ersetzen Sie im Verzeichnis System32 nun die Datei utilman.exe mit cmd.exe. Zuvor sollten Sie diese aber sichern, so dass Sie diese wiederherstellen können, nachdem Sie das Admini­strator­konto aktiviert haben. Überzeugen Sie sich, dass Sie in den folgenden Befehlen den Laufwerks­buchstaben verwenden, den Sie im Schritt 2 ermittelt haben:

    move d:\windows\system32\utilman.exe d:\
    copy d:\windows\system32\cmd.exe d:\windows\system32\utilman.exe

  2. Entfernen Sie das Installationsmedium und starten Sie den Rechner mit dem folgenden Befehl neu:
    wpeutil reboot
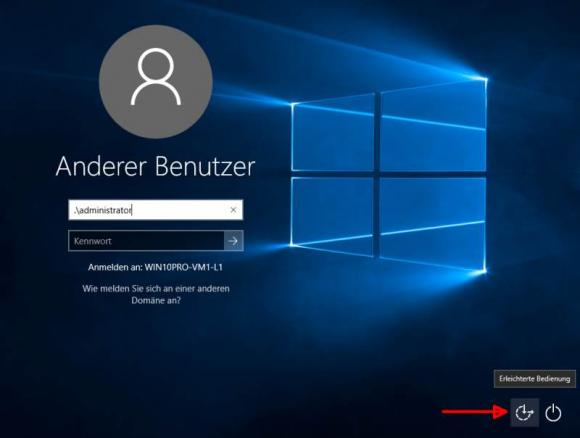
  3. Warten Sie, bis Windows 10 gestartet ist, drücken Sie eine Taste und klicken Sie rechts unten auf das Symbol für Erleichterte Bedienung. Nun sollte sich auf dem Anmeldebildschirm eine Eingabe­auf­forderung öffnen. Vor hier haben Sie nun vollen Zugriff auf Windows 10, ohne dass Sie sich angemeldet haben.

Nach dem Kopieren von cmd.exe nach utilman.exe und einem Neustart klickt man auf das Symbol "Erleichterte Bedienung".

Nach dem Kopieren von cmd.exe nach utilman.exe und einem Neustart klickt man auf das Symbol "Erleichterte Bedienung".

  1. Sie können anschließend das Passwort eines jeden beliebigen Kontos zurücksetzen oder den eingebauten Administrator aktivieren. Letzterer hat per Voreinstellung ein leeres Passwort, diesen Zustand sollten Sie sicherheits­halber ändern, bevor er freigeschaltet ist:

    net user administrator <Ihr Passwort>
    net user administrator /active:yes

  2. Nachdem Sie die Eingabeauf­forderung geschlossen haben, können Sie sich als Administrator anmelden. Wenn der Computer nicht Mitglied in einer AD-Domäne ist, dann reicht die Eingabe von „administrator“. Andernfalls müssen sicherstellen, dass Sie sich lokal anmelden, indem Sie dem Benutzernamen ein „.\“ voranstellen, und zwar nach dem Muster .\administrator.

Defender mit abgesichertem Modus umgehen

In manchen Fällen kann es passieren, dass sich bei Punkt 5 nach dem Klick auf das Symbol für Erleichterte Bedienung die Eingabe­aufforderung nicht öffnet. Dies liegt dann wahr­scheinlich an Windows Defender, der die Veränderung an der Datei utilman.exe beanstandet.

In diesem Fall startet man wieder bei Punkt 1 und klickt unter Punkt 5 nicht auf das Symbol für Erleichterte Bedienung, sondern bootet den Rechner in den abgesicherten Modus.

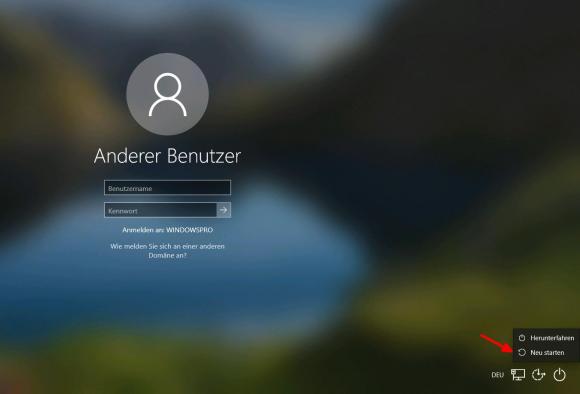
Dazu hält man die Umschalt-Taste gedrückt, während man den Befehl Neu starten ausführt.

Rechner neu starten und dabei die Shift-Taste gedrückt halten

Quelle: https://www.windowspro.de/michael-pietroforte/eingebautes-administratorkonto-windows-10-offline-aktivieren
How to Reset Your Forgotten Windows Password the Easy Way

Boot off the Windows disk and select the “Repair your computer” option from the lower left-hand corner.

Follow through until you get to the option to open the Command Prompt, which you’ll want to select.

First you’ll want to type in the following command to backup the original sticky keys file:

copy c:\windows\system32\sethc.exe c:\

Then you’ll copy the command prompt executable (cmd.exe) over top of the sticky keys executable:

copy c:\windows\system32\cmd.exe c:\windows\system32\sethc.exe

Now you can reboot the PC.

Resetting the Password

Once you get to the login screen, hit the Shift key 5 times, and you’ll see an administrator mode command prompt.

Now to reset the password—just type the following command, replacing the username and password with the combination you want:

net user geek MyNewPassword

That’s all there is to it. Now you can login.

Of course, you’ll probably want to put the original sethc.exe file back, which you can do by rebooting into the installation CD, opening the command prompt, and copying the c:\sethc.exe file back to c:\windows\system32\sethc.exe.

Quelle: How to Reset Your Forgotten Windows Password the Easy Way

How can I recover my sa Password?

To start SQL Server in single-user mode add the parameter -m at the command line. The easiest way to do this is to use Configuration Manager. Stop the SQL Server Instance you want to change. Right click the instance to open the Properties dialog and click the Startup Parameters tab. Enter –m in the Startup parameters.

Next, start the SQL Server Instance. Then open an elevated command prompt and enter sqlcmd. In the sqlcmd windows enter a command like you see following to add your login to the sysadmin group.

EXEC sp_addsrvrolemember ‚CONTOSO\mikeo2′, ’sysadmin‘;
GO

Quelle: How can I recover my sa Password?

NotesIPass – KeePass-Plugin for IBM Notes

IBM Lotus Notes add-in to get passwords from KeePass.

Requires KeePassHttp. Implemented using KeePassHttpClient.

Installation

  1. Download NotesIPass.dll
  2. Put NotesIPass.dll to IBM Lotus Notes installation folder, usually C:\Program Files\IBM\Lotus\Notes\ or C:\Program Files (x86)\IBM\Lotus\Notes\
  3. Add the following line to [Notes] section of your notes.ini

EXTMGR_ADDINS=NotesIPass

  1. Install KeePassHttp according instructions.

Request password screen

Source: https://github.com/nredko/NotesIPass/

Windows change access permissions from the command line

CACLS files /e /p {USERNAME}:{PERMISSION}

Where,

  • /p : Set new permission
  • /e : Edit permission and kept old permission as it is i.e. edit ACL instead of replacing it.
  • {USERNAME} : Name of user
  • {PERMISSION} : Permission can be:
    • R – Read
    • W – Write
    • C – Change (write)
    • F – Full control

For example grant Rocky Full (F) control with following command (type at Windows command prompt):

C:> CACLS files /e /p rocky:f

Read complete help by typing following command:

C:> cacls /?

Quelle: Windows change access permissions from the command line

have i been pwned? Test all users of your domain

Aus einem Powershell-Beispiel von „IT Pro blog“ weiterentwickelt
https://infracloud.wordpress.com/2015/10/29/have-you-been-pwned-use-powershell-to-find-out/
Get-Pwned.ps1

Import-Module „C:\adm\custom\BasicTools.psm1“
$Global:CheckURI = „https://haveibeenpwned.com/api/v2/breachedaccount“
$global:OutputPath = „C:\“
$global:results = @()
Function ValidateAddress($Emailaddress){
try{
$Request = Invoke-WebRequest -Uri „$global:CheckURI/$Emailaddress“
$Response = ConvertFrom-Json $Request
Return $Response
}
catch [exception]
{
Return $null
}
}
Function IsValidEMail($email){
    $EmailRegex = ‚^[_a-z0-9-]+(\.[_a-z0-9-]+)*@[a-z0-9-]+(\.[a-z0-9-]+)*(\.[a-z]{2,4})$‘;
    return ($email -match $EmailRegex)
}
Function IsValidDomain($mailaddress){
$domain = $mailaddress.Substring($mailaddress.IndexOf(„@“)+1)
$obj = Get-AcceptedDomain -Identity $domain -ErrorAction SilentlyContinue
if ($obj -eq $null){
$result = $false
}else{
$result = $true
}

return $result
}
Function ConvertHaveibeenpwnedObject($obj,$mailaddress,$username){
Set-ToolsLogAddLine -LogTXT „Compromised account $username, $mailaddress“
$result = New-Object -TypeName PSObject
$result | Add-Member -MemberType NoteProperty -Name username -Value $username
$result | Add-Member -MemberType NoteProperty -Name mailaddress -Value $mailaddress
$result | Add-Member -MemberType NoteProperty -Name HIBPAddedDate -Value $obj.AddedDate
$result | Add-Member -MemberType NoteProperty -Name HIBPBreachDate -Value $obj.BreachDate
$result | Add-Member -MemberType NoteProperty -Name HIBPDataClasses -Value ([system.String]::Join(„;“,$obj.DataClasses))
$result | Add-Member -MemberType NoteProperty -Name HIBPDescription -Value $obj.Description
$result | Add-Member -MemberType NoteProperty -Name HIBPDomain -Value $obj.Domain
$result | Add-Member -MemberType NoteProperty -Name HIBPIsSensitive -Value $obj.IsSensitive
$result | Add-Member -MemberType NoteProperty -Name HIBPIsVerified -Value $obj.IsVerified
$result | Add-Member -MemberType NoteProperty -Name HIBPLogoType -Value $obj.LogoType
$result | Add-Member -MemberType NoteProperty -Name HIBPName -Value $obj.Name
$result | Add-Member -MemberType NoteProperty -Name HIBPPwnCount -Value $obj.PwnCount
$result | Add-Member -MemberType NoteProperty -Name HIBPTitle -Value $obj.Title
return $result
}
Function main{
Set-ToolsLogCreate -LogFilePath „C:\adm\custom\logs\“ -LogPrefix „CompromisedAccounts“
Remove-ToolsLog -olderThenDays 21
Set-ToolsLogAddLine -LogTXT „Collect accounts“

$users = Get-ADUser -LDAPFilter „(mail=*)“ -Properties mail, proxyaddresses -ResultSetSize $null

$i = ($users).Count
Set-ToolsLogAddLine -LogTXT „Test $i accounts“
$i = 0
foreach($user in $users){
$i ++
if($i/100 -is [int]){Set-ToolsLogAddLine -LogTXT „$i accounts tested“}
$proxymail = „“
$usermail = „“
$usermail = $user.mail.ToLower()
$output = „“
if (IsValidEMail($usermail)){
if (isValidDomain($usermail)){
$obj = ValidateAddress($usermail)
if ($obj -ne $null){
$global:results += ConvertHaveibeenpwnedObject -obj $obj -mailaddress $usermail -username $user.SamAccountName
}
}
}
Foreach($proxyAddress in $user.proxyaddresses){
$proxymail = $proxyAddress.ToLower()
if ($proxymail.StartsWith(„smtp:“)){
$proxymail = $proxymail.Substring($proxymail.IndexOf(„smtp:“)+5)
if (IsValidEMail($proxymail)){
if ($proxymail -ne $usermail){
if (isValidDomain($proxymail)){
$obj = ValidateAddress($proxymail)
if ($obj -ne $null){
$global:results += ConvertHaveibeenpwnedObject -obj $obj -mailaddress $usermail -username $user.SamAccountName
}
}
}
}
}
}
}
Set-ToolsLogAddLine -LogTXT „Finish“ -foregroundcolor „green“ -backgroundcolor „darkgray“
$global:results | Export-csv „$global:OutputPath\CompromisedAccounts.csv“
}

main